REMOVING AND INSTALLING DOOR COMPLETE WITH BASEPLATE Removal: Raise the door. Lower the window. Turn ignition off. Caution! Pull out fuses 25 and 26 in the interest of safety (danger if being clamped in door or window) - see 51 00 for general information. Remove middel and rear side panels - see Group 41. Loosen expansion rivet.  51 00 000 41 35 000 41 35 000 51 00 000 41 35 000 41 35 000
| 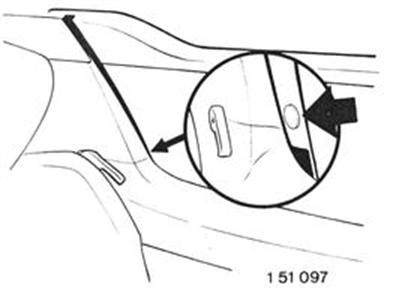 |
Operate door push button and push door down by hand. Unsrew screws and loosen expansion rivet. Take off plate. |  |
Loosen straps and disconnect plugs (1 to 4). 1 White plug (power window control) 2 Blue plug (window motor power supply) 3 Yellow plug (door motor power supply) 4 Black plug; two-way microswitch on lock (door control) 5 Black plug; microswitch on door push button (central lock control) | 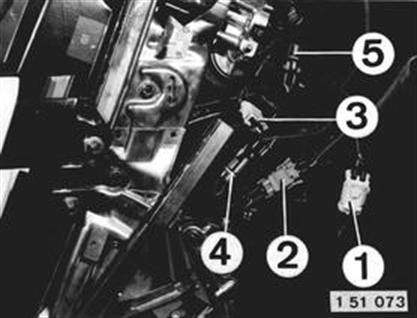 |
Loosen screws (1). Remove spacers. Installation: The thickness of required spacers is given at the place of installation - check for correct installation. Unscrew screw (2). Unscrew nuts (3). Unscrew and remove bolts (1). Take off door. | 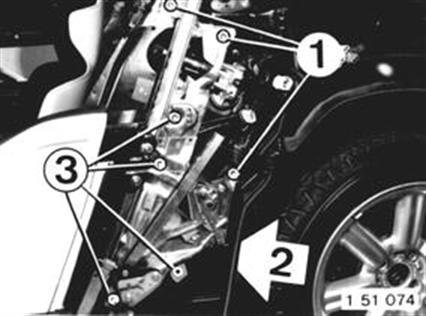 |
Installation: Check lockpin on door for damage, replacing if necessary. Unlock lock, pressing the door push button once if necessary. Adjust distance A between the door and baseplate. Note: When installed the door must hang on the toothed drive belt and may not engage in the lock. Distance A = approx. 150 mm (5.905"). Lubricate rubber lightly in B-pillar opening for the door lifting motor. Place spacers on staybolts (3) of the B-pillar between the body and baseplate. The spacers on the lock must be placed between the body and lock. Note: The thickness of required spacers is given at the place of installation. | 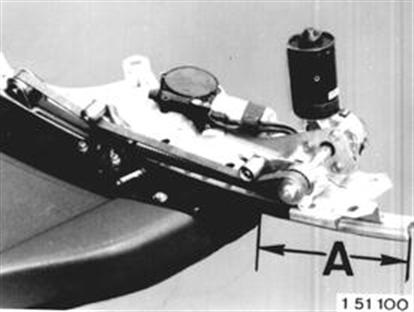 |
Install the door with baseplate while pressing the lock in forward direction until the pins on the lock engage in the slot of the baseplate. Install screws (1) and nuts (3). Use spacers on screws (1) between the baseplate and body. Install and tighten screw (2). Align the door - see 51 33. Tighten the toothed drive belt when necessary after aligning the door. 51 33 000
| |